I think it is safe to say that, the over coming great obstacles is a recurring theme in today society. It is portray as some heroic deed or something that forces the main character to grow as they work out their problems. Almost all of these obstacles seem like it is external, fighting the man for example or a school bully.
But what most people would often over look is over coming ones' self. Most people don't really analyze or that, they look at themselves through one set of lens. The ones that are lucky can either step back and critically analyze themselves or if they're truly lucky, they got friends that aren't afraid to point out theirs flaws.
I've met quite a few people that blamed their problems on other things, things that they have no control of, but the truth is: most of it are excuses. Man up, seriously. Find solutions. Change the mentality of impossible, to how can I over come this? Most of the time, the problem is they haven't really tried. They didn't put in the hours or the sweat. Sure they might try to take a stab at it but they didn't invest enough time.
"Nothing in this world that's worth having comes easy."
Over Coming
My Webserver Setup part 1

This tutorial is a bit of a rehash of slice host tutorial.
What I wanted was my own web server. The cheapest way of getting one without actually paying huge amount of sum is to get a virtual one, instead of a physical one.
I got a friend that uses SliceHost, which I set up Debian 5.0 (Lenny) on, and I googled for rivals so I can compare. Anyway I ended up with Linode, they offer much more ram for the price.
Here's my referral link if you are going to get it: http://www.linode.com/?r=934381863d0fe5c2b59ec57bf5f6e7049fc76d5d or just 934381863d0fe5c2b59ec57bf5f6e7049fc76d5d copy paste this. It'll just give me 20 bucks or about an extra month of hosting.
Here's the setup for my Debian server:
Load Image
So load up the Debian Lenny's image in Linode's manager.
Note: After you're done, you should have set up the root's password.
SSH / Logging into your server
Now you can SSH into your account, if you're using Window download Putty to ssh into your brand new virtual server. Note ssh default port is 22.
An example:
ssh root@123.45.67.123 Enable color console
Let's get some color onto the terminal. The reason for this is it helps distinguish files, folders, and other stuff; very helpful.
Go to your root directory:
cd /root Edit the .bashrc file:
nano .bashrc This is what I add/uncomment:
# ~/.bashrc: executed by bash(1) for non-login shells.

export PS1='\h:\w\$ '
umask 022

PS1='\[\033[0;35m\]\u@\h\[\033[0;33m\] \w\[\033[00m\]: '

# You may uncomment the following lines if you want `ls' to be colorized:
 export LS_OPTIONS='--color=auto'
 eval "`dircolors`"
 alias ls='ls $LS_OPTIONS'
 alias ll='ls $LS_OPTIONS -l'
 alias l='ls $LS_OPTIONS -lA'

# Some more alias to avoid making mistakes:
 alias rm='rm -i'
 alias cp='cp -i'
 alias mv='mv -i'
New User with Root power
It's not really a good idea to always use root account. What you should do is create a user with root power.
Let's create an Admin group:
groupadd admin Then let's enable this group to have root power:
visudoNow add under root:
## Allows people in group admin to run all commands
root   ALL=(ALL)       ALL
admin  ALL=(ALL)       ALL
Now add a user to be in the admin group:
adduser anthony


Put user anthony into the admin group:
usermod -a -G admin anthony

Good now you can use anthony instead of group all the time. Note: use your own username you don't have to use anthony. I chose anthony because it's my name ^_^.

Now you can use this user instead of root all the time:

 su anthony


Note: add color to your new user by changing the .bashrc file which reside in /home/anthony or ~.

 SSH config

Edit the ssh config file (I usually use vim or vi editor but the learning curve is high):
 sudo nano /etc/ssh/sshd_config

These are the things I've added/changed:

Protocol 2
PermitRootLogin no
PasswordAuthentication no
UseDNS no
AllowUsers demo


I didn't change the port because some applications expect SSH to be port 22. But you can change it if you want.


 Firewall aka iptables

Your server have no firewall what so ever right now. I'm worried about the hackers. So let's change that.

Let's see what firewall rules you have right now:
sudo iptables -L

This is what you should see as a clean default debian lenny installation:

Chain INPUT (policy ACCEPT)
target     prot opt source               destination

Chain FORWARD (policy ACCEPT)
target     prot opt source               destination

Chain OUTPUT (policy ACCEPT)
target     prot opt source               destination


Let's create our own firewall rules in a txt file:

sudo mkdir /root/firewall
sudo nano /root/firewall/iptables.current.rules


I created a firewall directory in /root folder because if I ever wanted to add new rules to the firewall, I'll back up the current set of rules, and save it in /root/firewall.

Here's the example rules from slice hosting you can put these rules in your iptables.current.rules:

*filter


#  Allows all loopback (lo0) traffic and drop all traffic to 127/8 that doesn't use lo0
-A INPUT -i lo -j ACCEPT
-A INPUT ! -i lo -d 127.0.0.0/8 -j REJECT


#  Accepts all established inbound connections
-A INPUT -m state --state ESTABLISHED,RELATED -j ACCEPT


#  Allows all outbound traffic
#  You can modify this to only allow certain traffic
-A OUTPUT -j ACCEPT


# Allows HTTP and HTTPS connections from anywhere (the normal ports for websites)
-A INPUT -p tcp --dport 80 -j ACCEPT
-A INPUT -p tcp --dport 443 -j ACCEPT


#  Allows SSH connections
#
# THE -dport NUMBER IS THE SAME ONE YOU SET UP IN THE SSHD_CONFIG FILE
#
-A INPUT -p tcp -m state --state NEW --dport 22 -j ACCEPT


# Allow ping
-A INPUT -p icmp -m icmp --icmp-type 8 -j ACCEPT


# log iptables denied calls
-A INPUT -m limit --limit 5/min -j LOG --log-prefix "iptables denied: " --log-level 7


# Reject all other inbound - default deny unless explicitly allowed policy
-A INPUT -j REJECT
-A FORWARD -j REJECT

COMMIT


It's up to you want port you want to enable. I usually reject all port unless I state otherwise.

Here's a list of official port: Wiki

Implement the rules:
sudo /sbin/iptables-restore < /etc/iptables.current.rules

Check out your implemented rules:
sudo iptables -L

Make sure everything is correct if not then you can flush it out and start over:
sudo iptables -F

Making the rules persist after a server reboot:

 sudo nano /etc/network/if-pre-up.d/iptables

Add these lines:

#!/bin/sh
/sbin/iptables-restore < /root/firewall/iptables.current.rules


Now save the changes and make your script, iptables, an executable:

chmod +x /etc/network/if-pre-up.d/iptables


note: These newly develop rules of yours will not persist if your server is rebooted unless you do the above step.


How to backup current iptables current set of rules:
 sudo iptables-save -c > iptables-backup.txt

 Change your server's timezone
Easiest way:

sudo dpkg-reconfigure tzdata

Spacebar to select, tab to move to other options, enter is to confirm. Just follow the gui.

 Change your server's locale (language)

sudo dpkg-reconfigure locales

For example, I chose en_US.UTF-8 UTF-8.

 Domain name

Since I bought the vps I didn't really bought the domain name yet. I went with godaddy.com for the anthonydoan.com address which is about $10.98 (USD). Note there's a lot of craptastic spam they'll throw at you while you try to register and pay for the domain. I dump the cart because of the spam and looked around and came back. Customer service is decent, you don't have to wait for a long time on the phone.

They'll ask you for your server hosting and you'll just supply like so:

ns1.linode.com
ns2.linode.com
ns3.linode.com
.... up to ns6


Using Linode's DNS manager you should be able to put your domain name and set it to master and you're done!
Great Programming Essays
- Programmers are Tiny Gods by Derek Powazek.
- In the beginning there was the command line by Neal Stephenson. Online, Download, Wiki it
http://stackoverflow.com/questions/194696/favorite-essay-about-programming
PHP howto: Installing PEAR with WAMP on Window
Installing PEAR:
Here's the tutorial that I followed.
What is missing is the environment variables installation part. The tutorial only give Vista.
Got this from Microsoft website.
- Right-click My Computer, and then click Properties.
- Click the Advanced tab.
- Click Environment variables.
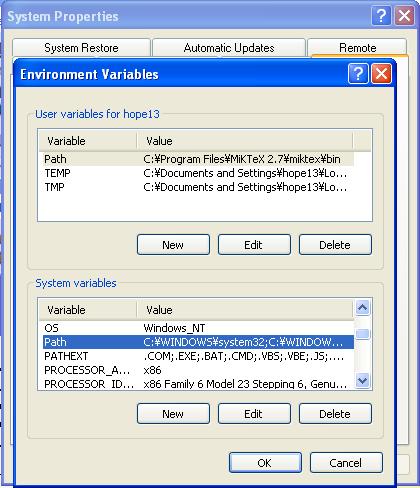
See the highlighted part under
System variables, Path? Edit the Path variable and add you can add semicolon c:\wamp\bin\php\php5.3.0 You need to exit the command line if you have it open so the changes can take into effect.

Type path and you should see it.
Book Review: Learning PHP, MySQL, and JavaScript: A Step-By-Step Guide to Creating Dynamic Websites (Animal Guide)
Learning PHP, MySQL, and JavaScript: A Step-By-Step Guide to Creating Dynamic Websites (Animal Guide)


I needed to review php since everything have changed. I've tried head Head First PHP & MySQL and it wasn't technical and I thought the book style of teaching would help me absorb it better but it didn't. This book assume that you know a bit of programmer which is good cause you go through stuff much faster and absorb it better than the slow pace of Head First PHP & MySQL.
Anyway, this book went straight to each subject. It hits you with PHP, the MySQL, and touches on other subject. When I hit the Javascript part I stopped.
There are lots of code example errors and you should go here:
http://oreilly.com/catalog/errata.csp?isbn=9780596157142
Some of the stuff that the author goes over is confusing and shouldn't be use at all. For example, his php code example of combining HTTP authentication with PHP session code, the author goes over, a bit, about it and then briefly says something about logout session. You logout but only in the session as for the HTTP Authentication you haven't logout. How are you suppose to do this? I've tried clearing my browser personal data like cookies and such but with no luck. I've google and the consensus was to have a flag for the logout and the script should all be in one file unlike his 2 files (http auth and session) example.
There's also a line in the logout code that call the session again which throws an error, this code isn't corrected yet nor is it in the errata link above.
The Smarty introduction was basically an introduction, nothing more. The installation instruction was vague and unclear that's why I have a post on how to install it on window xp, (here). Linux should be a breeze.
The book example codes for php are all procedural. He doesn't really go into object oriented programming. When I hit the Javascript chapter I just stop reading. His Javascript coding style is horrible and ugly. The best practice is to declare the variable as
var varible1 which he doesn't do and he ignore the semicolon because, in javascript, it isn't require. There is a better beginner Javascript book and I'll post up that review soon.The mysql chapters are pretty good. It taught me new stuff about MySQL such as different database engine that MySQL have InnoDB and ISAM. It also show how to search through the database like a search engine. It was a good read, for me.
This book is a very basic beginner PHP for people that have a programming background. I would rate it a 3 star because it helped me dive back into PHP and solidify the very very basic of php5. It does not go into object oriented aspect of PHP5 at all. Warning: I've only read up to the Javascript part, I stopped afterward. Read up to chapter 16, there are 20 chapters in total.
Oh, I get Amazon moola, to buy more books, if you click the picture and buy the book. I wouldn't recommend buying it though.
Mounting an External ntfs harddrive on Linux for writing

Note: In order to mount you need GNU yak/water-buffalo and apparently a Lion.
If you have a external harddrive the files system is fat32 or fat16 then you can read and write to it.
But if you have a ntfs file system you can only read-only from it because writing to it is some FOSS legal stuff. Ugh. Read-only file system warning is annoying!
But there is a solution which I will summary and when I have the time I'll write it more in detail.
Google ntfs-3g. You need that package to manually mount through /etc/fstab. Remember to create a mount directory I made one in /mnt (eg /mnt/window).
Then you mount -a command. But you need to find the name of your external hd which you can do with fdisk -l command and locate your harddrive by memory size if you're using usb it's sdb I believe.
Recovering Harddrive with dead filesystem
So my landlord computer is shot so he wants the file. Problem is his filesystem is dead, his master boot record is shot to death beyond mountable. So what to do...
You do this:
http://www.debian-administration.org/articles/420
It didn't work so I did PhotoRec which is cover in the above link and retrieve files. It took 160 passes and it still didn't finish so I just grab what it retrieved.
Finding a good PHP IDE - Eclipse + PDT
So after using Dreamweaver CS3 for a couple months now I felt it was lacking. It wasn't as good as Microsoft Visual Studio. One of the thing it's lacking is a good auto complete, the way Dreamweaver CS3 handle most of the coding is annoying and not as natural as Microsoft Visual Studio.
I've googled a bit and found out about Eclipse IDE with PDT. So far it's a great ide. I do not know all about it but just enough through these videos:
Note: Code Assist is not on by default so you need to go to window->preferences->php->code assist and check the "enabled auto activation" checkbox the default 200 ms is long so I edit it to 20 ms.
Installation for Smarty PHP on WAMP
![]()
I got this from here: http://news.php.net/php.smarty.dev/2703
www folder (ex: c:\wamp). Rename the Smarty.x.x.x folder to smarty. php.ini file. To do this, left click on the wamp icon on the system tray, under php menu, there should be a php.ini option. include_path = ".;c;\wamp\smarty\libs"www create a folder name smarty and within that folder create two folder named templates and configs. Outside of www, within the c:/wamp/smarty create these two folders templates_c and cache.www or any subfolders within www create a file any name you want, let's say index.html.index.html:
index.tpl (put it in www/smarty/templates):Look here: http://news.php.net/php.smarty.dev/2703. Blogspot will just parse out the html tags. So I cannot type it here.Make your internet faster: Faster DNS & Free Fast DNS

namebench is a google project that will find the fastest DNS around your area. It takes a while.
Free Fast DNS:
Free Public DNS Server
Service provider: Google
- 8.8.8.8
- 8.8.4.4
Service provider: ScrubIt
Public dns server address:
- 67.138.54.100
- 207.225.209.66
Service provider:dnsadvantage
Dnsadvantage free dns server list:
- 156.154.70.1
- 156.154.71.1
Service provider:OpenDNS
OpenDNS free dns server list:
- 208.67.222.222
- 208.67.220.220
Service provider: vnsc-pri.sys.gtei.net
Public Name server IP address:
- 4.2.2.1
- 4.2.2.2
- 4.2.2.3
- 4.2.2.4
- 4.2.2.5
- 4.2.2.6
Fast DNS made possible thanks to this site.
Change timezone Debian Lenny

Needed to change timezone on a server to match our client.
Run this command:
sudo dpkg-reconfigure tzdata
And it'll come up with a GUI like command line and you just select with space
bar and tab through options and enter to confirm. Real simple.
Thanks to:
http://www.zeitoun.net/articles/timezone-change-debian-lenny/start
Jquery Progress Bar, pecl c, PHP module, Debian
Howto install PECL uploadprogress
I need the uploadprogress php module for jquery progress bar. The reason why my boss and I chose this progress bar to the other ones out there is because this one does not use flash. Flash got some annoying bugs and it make web development annoying and at the same time makes our code ugly --full of band-aids and workarounds. Furthermore it was so hard to find any upload module for jquery that doesn't require flash. The reason for this is because javascript does runs on client side so they cannot keep track of the progress on the server side. Hence, how the is the progress going to gauge the completion percentage? The answer is a php module named uploadprogress.Anyway, in most Linux distribution you install stuff and add a line in php.ini such as
extension=uploadprogress.so and you're done. Not in debian!Anyway here it is:
Step 1: Installing
sudo aptitude install php5-dev php-pear
sudo pecl install uploadprogress
Step 2: The Debian way of extension=uploadprogress.so
You need to create a file in conf.d to enable the any php extension in debian.
sudo vim /etc/php5/conf.d/uploadprogress.ini
Here's what my
uploadprogress.ini looks like:
# configuration for php uploadprogress module
extension=uploadprogress.so
Step 3: Restart apache2
sudo /etc/init.d/apache2 restart